

Meta Title
How Screen Record iPhone – Easy Step-by-Step Guide with Audio (2026)
Meta Description
Learn how screen record iPhone quickly and easily. Discover how to enable screen recording, record with sound, edit recordings, troubleshoot common issues, and share videos on any iPhone model.
How Screen Record iPhone: Everything You Need to Know
How Screen Record iPhone has become one of the most useful features available on modern smartphones. Whether you want to create a tutorial, save a gameplay session, record a video call for reference, or capture a technical issue for troubleshooting, knowing how screen record iPhone can save you time and effort.
Apple introduced built-in screen recording functionality to make it easier for users to capture everything happening on their screens without installing third-party apps. The feature is simple to use, highly effective, and available on most modern iPhone models running recent versions of iOS.
How Screen Record iPhone Many users are unaware of the full capabilities of iPhone screen recording. Beyond simply capturing the display, you can record audio, include microphone commentary, edit recordings, and share them instantly with others. Understanding these features can help you get the most out of your device.
This guide explains everything you need to know about how screen record iPhone, from enabling the feature to solving common problems and maximizing recording quality.
What Is Screen Recording on iPhone?

Screen recording is a built-in iOS feature that captures everything displayed on your iPhone screen as a video file.
How Screen Record iPhone Unlike screenshots, which capture a single image, screen recordings create videos that show actions, movements, gestures, app interactions, and animations. This makes them ideal for tutorials, demonstrations, presentations, and troubleshooting.
The recordings are automatically saved to the Photos app, where they can be viewed, edited, and shared like any other video.
How Screen Record iPhone Because Apple integrates screen recording directly into iOS, users don’t need to download additional software or applications to use it.
Requirements for Using Screen Recording on iPhone
Before learning how screen record iPhone, it’s important to ensure your device meets the necessary requirements.
Your iPhone should be running a compatible version of iOS. Most devices running iOS 11 or later support screen recording functionality.
You should also have enough available storage space. Video recordings can consume significant storage depending on their duration and quality.
How Screen Record iPhone Additionally, some apps may restrict screen recording due to privacy, copyright, or security concerns. Streaming platforms and certain banking applications may block or limit recording features.
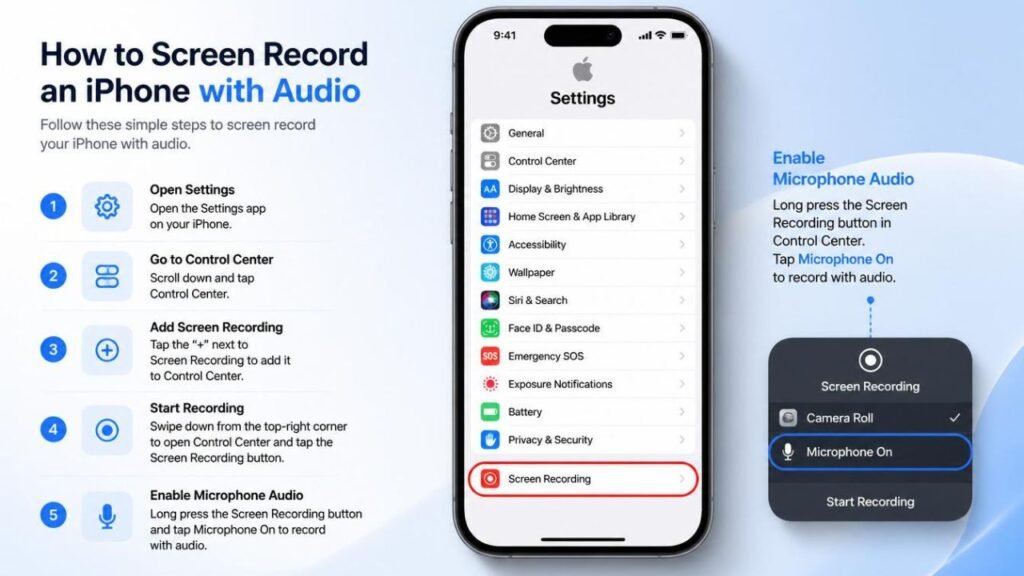
How to Enable Screen Recording on iPhone
The first step is adding Screen Recording to your Control Center.
Step 1: Open Settings
Launch the Settings app on your iPhone.
Step 2: Access Control Center
Scroll down and tap “Control Center.”
Step 3: Add Screen Recording
Locate Screen Recording in the list of available controls and tap the green plus (+) icon next to it.
Once added, the Screen Recording button will appear in your Control Center for quick access.
This setup process only needs to be completed once.
How Screen Record iPhone in Simple Steps
Once Screen Recording has been enabled, recording your screen becomes extremely easy.
Open Control Center
On Face ID models, swipe down from the top-right corner of the screen.
On Touch ID models, swipe up from the bottom edge of the screen.
Tap the Screen Recording Button
Look for the circular recording icon.
Tap the icon once.
A three-second countdown will begin, giving you time to prepare before recording starts.
Start Recording
After the countdown ends, everything displayed on your screen will be captured.
You can open apps, browse websites, play games, demonstrate settings, or perform any activity you want to record.
Stop Recording
To stop recording, tap the red recording indicator at the top of the screen and select “Stop.”
Alternatively, reopen Control Center and tap the recording icon again.
Your recording will automatically be saved to the Photos app.
How to Screen Record iPhone with Audio
Many users want to record voice explanations along with their screen activity.
Fortunately, Apple makes this process simple.
Enable Microphone Audio
Open Control Center.
Press and hold the Screen Recording button.
A menu will appear.
Tap the Microphone icon to turn it on.
The icon will change color to indicate that microphone recording is enabled.
Now, when you start recording, your voice will be captured along with screen activity.
This feature is especially useful for tutorials, educational content, gameplay commentary, and technical demonstrations.
Where Are Screen Recordings Saved?
After stopping a recording, iPhone automatically saves the video to the Photos application.
To access your recording:
- Open Photos.
- Tap Albums.
- Scroll to Screen Recordings.
You can also find recordings in your Recents album.
From there, you can watch, edit, share, or delete recordings as needed.
This automatic saving process ensures your recordings are immediately available without requiring manual export.
How to Edit a Screen Recording on iPhone
After creating a screen recording, you may want to trim unnecessary sections.
Apple provides built-in editing tools within the Photos app.
Open the Recording
Launch Photos and select the recording.
Tap Edit
Choose the Edit button in the upper-right corner.
Trim the Video
Drag the handles at the beginning or end of the timeline to remove unwanted footage.
Save Changes
Tap Done and choose Save Video.
This quick editing process helps create cleaner, more professional-looking recordings.
Common Uses for iPhone Screen Recording
Screen recording has become increasingly popular because of its versatility.
Creating Tutorials
Many content creators use screen recording to teach users how to navigate apps, configure settings, and solve technical problems.
Recording Gameplay
Mobile gamers frequently record gameplay sessions to share achievements, walkthroughs, and highlights.
Capturing Software Bugs
Developers and users often record issues to demonstrate software problems and report them more effectively.
Saving Online Content
Screen recording can help capture presentations, webinars, or educational content for personal reference when permitted.
Business Demonstrations
Professionals use screen recordings to create training materials, presentations, and instructional videos.
How to Improve Screen Recording Quality
High-quality recordings look more professional and are easier to watch.
Close Background Apps
Closing unused apps can improve performance and reduce lag during recording.
Enable Do Not Disturb
Notifications appearing during recordings can be distracting.
Activating Focus Mode or Do Not Disturb helps prevent interruptions.
Maintain Battery Life
Long recordings consume battery power.
Consider charging your iPhone before recording lengthy sessions.
Keep Storage Available
Low storage can impact recording performance and prevent successful saves.
Regularly remove unnecessary files if storage becomes limited.
Why Screen Recording May Not Work
Sometimes users encounter issues while attempting to record their screens.
Several factors may cause these problems.
Low Storage Space
Insufficient storage can prevent recordings from being saved properly.
Screen Time Restrictions
Parental controls or Screen Time settings may disable screen recording functionality.
Unsupported Apps
Certain applications intentionally block recording due to copyright or security restrictions.
Software Bugs
Temporary iOS glitches can occasionally affect recording performance.
Restarting your device often resolves minor software issues.
Troubleshooting Screen Recording Problems
If screen recording is not working correctly, try the following solutions:
Restart Your iPhone
A simple restart often fixes temporary software problems.
Update iOS
Installing the latest iOS version ensures bug fixes and improved stability.
Check Screen Recording Settings
Verify that Screen Recording remains enabled in Control Center.
Free Up Storage
Delete unnecessary files or applications if storage is nearly full.
Reset Settings
If problems persist, resetting settings may help restore normal functionality.
Screen Recording Privacy and Security Tips
While screen recording is convenient, users should be mindful of privacy concerns.
Avoid recording sensitive information such as passwords, financial details, or personal messages.
If recording demonstrations or tutorials, review the footage carefully before sharing.
Be cautious when recording video calls or meetings, as local laws and regulations regarding consent may vary.
Practicing good privacy habits helps protect both your information and the privacy of others.
Benefits of Using Built-In iPhone Screen Recording
The native screen recording feature offers several advantages over third-party applications.
First, it is completely free.
Second, it integrates seamlessly with iOS.
Third, there are no advertisements or subscription fees.
Fourth, recordings are automatically saved and easily accessible.
Finally, Apple’s optimization ensures smooth performance and reliable operation across supported devices.
These benefits make the built-in solution ideal for most users.
Future of Screen Recording on iPhone
Apple continues enhancing iOS features with every update.
Future improvements may include higher recording quality, advanced editing tools, AI-powered enhancements, and expanded audio controls.
As content creation becomes increasingly important, screen recording will likely remain a key feature for students, professionals, educators, gamers, and everyday users.
The ability to capture and share digital experiences quickly and easily continues to grow in value across personal and professional environments.
Conclusion
Understanding how screen record iPhone is an essential skill for modern smartphone users. Apple’s built-in screen recording feature makes it easy to capture tutorials, gameplay, app demonstrations, presentations, and troubleshooting videos without installing additional software.
By enabling Screen Recording in Control Center, activating microphone audio when needed, and using the built-in editing tools, users can create professional-quality recordings in just a few minutes. Whether you’re a beginner learning the basics or an experienced content creator, mastering iPhone screen recording can significantly improve productivity and communication.
With proper settings, sufficient storage, and attention to privacy, screen recording becomes one of the most valuable tools available on any iPhone.
Frequently Asked Questions (FAQs)
1. How do I screen record on an iPhone?
Open Control Center, tap the Screen Recording button, and wait for the countdown to begin.
2. Can I record audio while screen recording?
Yes, you can enable microphone audio before starting the recording.
3. Where are screen recordings saved?
Screen recordings are automatically saved in the Photos app.
4. Why can’t I find the screen recording button?
You may need to add it through Settings > Control Center.
5. Does screen recording work on all iPhones?
Most iPhones running iOS 11 or later support screen recording.
6. Can I edit screen recordings?
Yes, you can trim and edit recordings directly within the Photos app.
7. Why is my screen recording not saving?
Low storage space is one of the most common reasons.
8. Can I screen record video calls?
Technically yes, but always respect privacy laws and obtain consent where required.
9. Does screen recording capture notifications?
Yes, unless Do Not Disturb or Focus Mode is enabled.
10. Is iPhone screen recording free?
Yes, it is a built-in feature included with iOS at no additional cost.